
Well, I haven’t posted anything at all in our year of living in Florida. But we have big news! We are moving back to Denver!! Our house was listed on Wednesday and got several offers and are now under contract! God’s … Continue reading

Well, I haven’t posted anything at all in our year of living in Florida. But we have big news! We are moving back to Denver!! Our house was listed on Wednesday and got several offers and are now under contract! God’s … Continue reading
As most of you know, Calder and I have moved to Tampa! We were sad to leave our beloved first home, friends, and the city of Denver, but his job transferred us here and it was a great opportunity we felt like we should take. One big positive is that we can get a lot more for our money house wise than we could in Denver. So now we have our little fixer upper. We are currently camping out in one of the bedrooms while the kitchen is gutted and we wait for the dirty work to be done before we refinish our floors and move the rest of the way in. But I wanted to share some before pics so when we are done we can see how far we’ve come!
Exterior:


We love the bungalow charm, big backyard, and especially the big bougainvillea bush and big trees in the yard! We definitely have some ideas for the outside, but we probably wont get to those for quite some time. We hope to put an addition on the back of the house in about a year that will add and ensuite master and walk-in closet as well as give us a better laundry room space.
Kitchen:


 This space already looks so much better and its just bare studs right now! haha This is obviously the main project happening right now. But while we are at it we got to add some can lighting to our living room, and we are going to have our plaster walls repaired and resurfaced throughout the house.
Living/Dining Room


 We LOVE all the light in our house. And the floors are lovely. The exposed parts were actually in pretty good shape but since we took out the carpet in the bedrooms and we are refinishing the original wood in there, we have to do it everywhere in order to get a uniform look. You can see some of the plaster damage in these pictures as well. We can’t wait to get those fixed so we can get some much needed paint in all of the rooms! And we have plans to probably white wash or paint that fireplace too.
Bedrooms:


 We are camped out in the gold room right now!
Bathroom / Laundry Room


 Both these spaces are not the prettiest. We are hoping to redo the bathroom around New Years (hint for parents: Home Depot gift cards for Christmas please!!!) and DIY pretty much all of that. I do like the original stained glass window though. Hopefully a new color scheme will work better with it though. The pink isn’t doing it for me. This laundry room will get torn down when we do the addition so other than cleaning and getting new laundry machines, and maybe painting we won’t really do much in here for now.
Here is the extent of our DIY projects so far:
 We scraped the popcorn ceilings and did a little kitchen demo and QUICKLY realized we were in over our heads. Luckily we had a great contractor recommendation who has been awesome in helping us get back to the point where we can hopefully DIY some things — we’re thinking of laying the tile floors and back splash ourselves. He’s also been really great in that he’s just helping where we need him and still allowing us to get our own sub contractors so we’re saving a little money that way. Here are the tentative plans for the kitchen I threw together on sketch up:

 We met with a cabinet/counter lady today so hopefully we can get those ordered if the quote comes back okay next week! Possibly counters too. Tile shopping tomorrow! We are hoping to be mostly done by Thanksgiving. Fingers crossed!!
Last post, you saw a sneak peek of our newly finished backyard. This post, you can see it fully! I am gonna keep the words to a minimum and let the pictures do the talking. So get scrolling to see the official reveal!
First, some before pics. One from the real estate listing when we bought it, and this crazy winter photo I found on my computer the other day 🙂

And now the afters!


 We’ve been getting A LOT of use out of this space already! I can’t wait to continue using it all summer and watching my garden grow. My favorite way to enjoy it? Laying in the hammock of course! My handy hubby made sure to rig up a way to hang it for me 🙂 Now I can recreate one of my favorite parts of our Mexico vacation right in our backyard!
 And for good measure, a side-by-side before and after pic!
 This project was a lot of hard work and consumed our lives for about a month and a half, but it was SO worth it! I’ll be doing some DIY posts on the paver patio, raised garden bed, and the deck soon, as well as info on the shed and furnishings, so stay tuned!
Anyone else doing big or small outdoor projects? Tis the season!
It’s no secret to those who know me that I love to dream about travel ALMOST as much as I love to actually travel. I thought it would be fun to combine my love of travel with my love of design and create a space inspired by my a cool destination. One of my dream destinations is the Greek Islands, especially Santorini. Although I haven’t actually been there yet, there are plenty of gorgeous photos to inspire me! The bright white contrasting with the bright blues of the rooftop and the ocean, the character & history in every old street. Inspiration is not hard to find.
Here is a small sample for your day-dreaming pleasure 🙂

(photo sources: first, second, third)
 Sources: Sofa // Side Table // Art // Pillow 1 (only $10!) // Pillow 2 // Pillow 3 // Side Chair // Coffee Table // Ship in a Bottle // Driftwood Sculpture // Lamp // Rug (trade source)
What do you think? Would you feel like you’re in Greece in this living room?
Have you seen our DIY travel tracker map? Check it out here!
If you missed my most recent travel posts, you can find some recommendations for the Playa del Carmen, Mexico area here and here.
This weekend my family came to visit! It was such a blast to show them our city and newly finished backyard. And by newly, I mean we finished it the night before they came 🙂 I will have more detailed how-to posts soon, but for now enjoy these sneak peek photos of my family enjoying the space and allowing me to practice using my camera on them!


 We also tried to squeeze in a little park time before the rain (and some more camera practice!)


 We spent the day Saturday hiking Cheeseman Canyon which is one of my favorite hikes, as you can see here and here. If you’re looking for a beautiful and non-strenuous hike fairly close to Denver (about 1.5 hours drive) I definitely recommend this one!
 What did everyone else do on the 3-day weekend? Happy Memorial Day and thank you to all of the service men & women!
You may have noticed in my last post that some of the pictures were a lot better than they have been! (Or maybe you didn’t 😉 ) But I got my DSLR finally! It’s a Nikon D3200 and I’ve been having a lot of fun playing with it and learning how to shoot manually (with some major help from miss Jamie!).
But in my world, you can’t have a fun camera without fun accessories! Here’s a round up of some things I’m eyeing or have already bought!

I’ve had a lot of experience with creating wood walls in the recent months! We built a white paneled wall in our bedroom back in January, and then more recently I did a faux-weathered wood wall for my church. I don’t have many step-by-step pictures but I will do my best to fill in the blanks with words 🙂  In our bedroom, I was going for a more clean, modern look while still adding lots of texture and character. At church, we were going more for a rustic, Restoration Hardware-ish style. Here’s a run down of each!
White Wood Wall  Supplies:
3/8″ thick plywood, cut to 6″ wide planks (you can get the plywood cut at Lowe’s or Home depot, or do it yourself if you have the right tools!)
Nail gun & 2 1/4″ long nails Saw (preferably a table saw)
White Paint (we used Ben Moore Chantilly Lace)
A nickel for a spacer
Quarter round for edges
Start by determining the lengths of each plank based on where the studs are. Each plank needs to be nailed into the all of the studs it crosses. We determined the lengths as we went because we were going for a random look. I also liked the look of visible gaps, so we used a nickel as a spacer to keep them as even as possible. (I took this nickel picture after the wall was done, but really we did this as we were attaching them to the wall before the pieces were painted.)

 Continue this process of measuring, cutting, and nailing until you reach the the top. If you’re lucky, your last piece will fit in perfectly! A more likely situation is that you will need to rip the last board down to size. Once you get the last one in, you can start filling the wood holes with wood putty if you’re going for a very clean look (we did do this). Next a quick sanding of any splinters and rough putty spots. Now you’re ready to paint! It took me 1 coat of primer and 2 coats of paint to get the coverage I wanted.
  Lastly, add the corner round to the corners on each side. This will really clean up the edges and give you a more finished look. You can buy this pre-primed to cut down on your painting. I pre-painted this completely so I could avoid getting any white paint on our gray walls.

After the paint dries and the smell airs out (use Low- or No-VOC paint to cut down on fumes!) you’re ready to move back in! We were camping out in our living room during this whole process (aka 4 nights) and though the “camp out” had us feeling like kids again the first couple nights, we were sure ready to sleep in our bed again by the end!!  PS- click here for a tutorial on those lamps!
Faux Weathered-Wood Wall  Supplies:
Cedar 1×6’s
Various Stain Colors
Nail Gun
Saw
The process for this type of wood wall is a little different. The first difference is that you need to pre-stain your cedar (note: it is important to use a wood species that is more resistant to warping, like cedar or oak. Oak is more expensive, which is why we went with cedar.). To get the weathered look, we went with a combination of Minwax’s Ebony, Classic Gray, and Espresso oil-based stains. We mixed the stains in different combinations and even used more than one color per board to get a more naturally-aged look. 
 Wear gloves and clothes you don’t care about when using oil-based stains, as it’s hard to get it out of skin and clothes. We used the same process of measuring based on the location of our studs, then cutting and nailing to the wall in a random pattern. Visible gaps didn’t go well with the style we were going for this time, so we skipped the spacer.
  Like the white wood version, continue measuring, cutting, and nailing until the wall is completely filled! Be conscious of the spacing the various wood tones around so the wall looks balanced. Again, you will likely need to rip down the top layer to the correct size. We skipped the wood filler and the quarter round steps on this one since the nails blended in to the wood’s various tones and the raw edge lent itself to the look I was going for.
 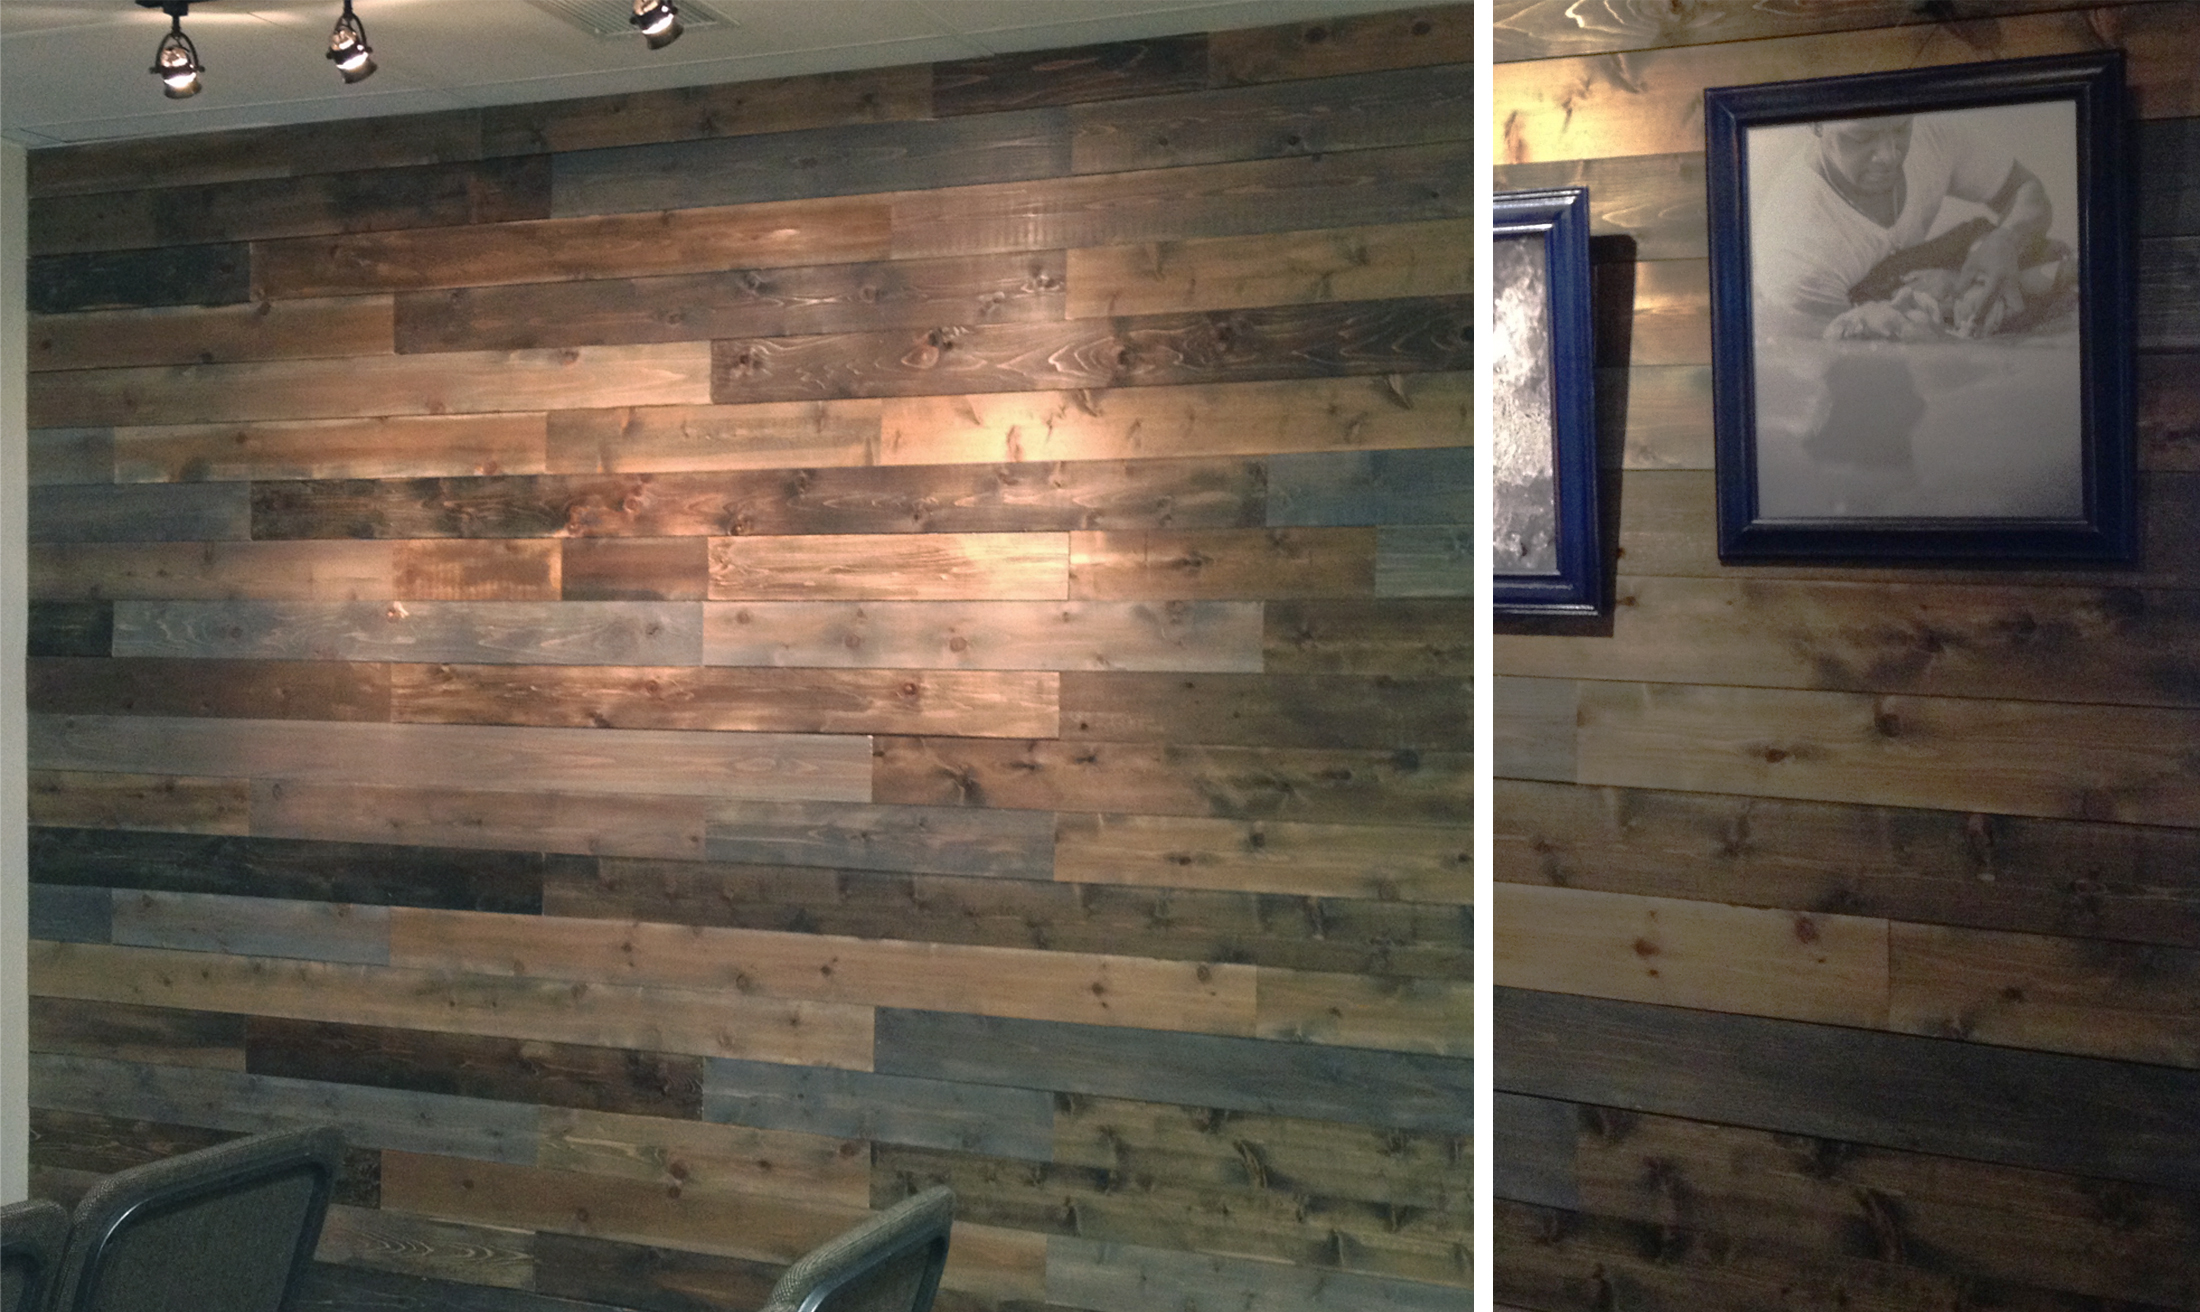 Are any of you itching to add some wood wall to your life?? Now you have options! Either of these is a great way to add some architectural interest to your home.
Although we had snow here in Denver on Mother’s Day, for the most part spring is here! It’s time to start thinking about what to plant in the garden. I’m a novice gardener myself, and bulbs are a great low-maintenance way to go when adding some life to your yard!

I recently discovered a great organization through our church called Blossom Care Network. This organization is based in Denver and takes in children rescued from sex-trafficking in Colorado. These children are placed into the foster care of people specially-trained by this organization to help these children heal from their traumatic experiences. Also, they continue to care for the children into their adult years and do not abandon them when they turn 18.
One way to support this organization is to buy bulbs through them and a portion of the proceeds directly benefits them. I got some for Mother’s Day gifts and some for myself and wanted to spread the word! They arrived quickly and I can’t wait to plant them!
Click here to get your summer blooming bulbs, on sale until June 1! Bring some beauty to your yard or pot while benefiting a great cause!
My good friend Jamie, owner of Jamison Gale Photography, is a very talented photographer. She’s the one who took my headshot to the right and all of these fairy-tale images of Calder and I! She currently works out of her home and while it’s working just great for her, who can blame her for dreaming of a beautiful studio space to call her own?!
After referencing her Pinterest boards and consulting with her, I came up with this mood board she can reference when that day does come 😉 The white-washed wide plank floors add a lot of character while keeping things light, while the wood tones add warmth. The space offers her a dedicated (and chic!) work space, plenty of storage and display opportunities, and an area for client consultation. I just loved the pillow as a nod to what she does and to film cameras (her favorite tool). And she had a special request for a fiddle leaf fig which always adds an interesting and living element to any space.

Sources:
Desk // Desk Chair // Chandelier (trade source) // Love Seat // Rug // Side Chairs // Pillow // Coffee Table
If you’re looking for a photographer that captures the light in an amazing way and is super great to work with, definitely check out Jamison Gale Photography!
I’m back today with one more Mexico recap and recommendation! I mentioned in this post that we did an excursion on our recent trip to Mexico. Although often these tour-guided trips can be pricey, I thought this one was worth it! The one we did was with Mayaland tours and was called Tulum & Tankah. We were able to book it right at our hotel which was very convenient. One great thing about this company was that the size of our tour group was relatively small. We only had about 5 couples in our group, which made the experience feel less touristy. The other I loved about this particular excursion was how it combined elements of history with adventure.  I’ve been to Playa del Carmen a handful of times in my life, but I had never been to any of the Mayan ruins. We were excited (well okay, I was more excited about this part than Calder) to be able to visit some ruins at Tulum! These ruins aren’t the biggest structures in the area, but they sit right on the coast and once acted as a popular port city. The site was beautiful! I love seeing ruins and imagining what life was like when they were fully functioning buildings.

 After spending some time exploring and checking out the “secluded” beach (not so secluded if you count the droves of tourists!) we were back in the van heading to the eco-adventure village called Tankah. This village is inhabited by Mayan descendants still trying to keep some of their culture alive. On site, they had several cenotes that we swam in and zip-lined over.
 After an authentic Mayan lunch, we got to go off-roading in some Jeep wranglers. The boys took turns driving the car and the off-road trail was actually a lot more exciting than we were expecting! Calder loved it so much, when we got home he traded in his truck for one. (Not kidding, we had one within a week hahaha! My husband can be quite impulsive 😉 )
  If you’re planning a trip to the Yucatan and are wanting to do a guided excursion, I definitely recommend this one. The variety of activities will ensure you don’t get bored and the small size of the group will also enhance your experience. Happy planning!
