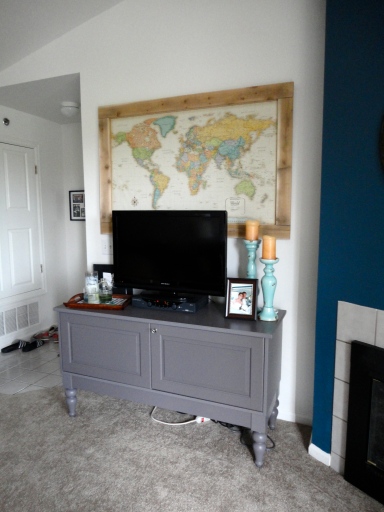
A few days ago I gave a sneak peek of the map project we would be working on this weekend. And I’m excited to now be able to show you the finished product!
Our apartments have several vacant garages and we “borrowed” one to use to make this project outside but protected from the wind. We have been wanting to do this for a while and we have had the map for a couple of months now. We found it on amazon, but not sure exactly which one. We knew we wanted it to be pretty big and to be able to pin the places we’ve traveled but we didn’t really think about how we wanted to frame it or hang it until we started making it. And so this was definitely a learning experience as we made it work as we went and had no tutorial to follow! BUT if you wanna make your own like we did, here is a tutorial for YOU!
Originally we were going to back it with cork, but when I went to buy it, it was pretty expensive and it was too thin so we would have had to buy another material to back the cork with. My construction hubby came up with the idea of using styrofoam insulation and it worked perfect!
So first step is to get some insulation from any big box home improvement store. It will most likely only come in large sheets, but it was still cheaper than the cork idea. You will only need about half of it. You will also need some spray adhesive. First step is to spray the half of the insulation you are going to use pretty thickly and then also spray the back of the map. Allow to dry slightly before sticking them together (about 1 min).
Look at my good lookin’ helper 😉
CAREFULLY lay the map onto the styrofoam, making sure to press out the air as you go. Start at one end and have your helper slowly lower the other end while you are smoothing it out with you hands from center to edges. Once it is flat and stuck, put the other half of insulation over it and then put something heavy on top of that. Allow it to dry flat for 20-30 minutes to help it really adhere.
My husband came up with the idea of framing it with cedar planks to give it a rustic feel and to be substantial enough for the size of the map. So we measured the sides and went and got the pieces cut according to our measurements. Then we secured the pieces together using these metal tack plate things..not sure the official name 🙂
The tack things cause the boards to tilt a little bit so we also reinforced the corners with finish nails to make sure they laid flat. It would have been good if we had made sure it was square before nailing it together…but luckily we got it pretty close just eyeballing it. If you are doing this, I’d recommend squaring it off with a tool before nailing it 🙂
Now we needed to attach it to the frame. We first traced the frame around the map and cut the insulation accordingly. We wanted it to be a little smaller than the frame itself so we made sure to cut inside the lines about a 1/2″. We then super glued all around the map on the insulation border, not getting glue on the map except for the corners. Carefully we laid the frame on top of the glue and put pressure on it (aka sat on it) for a couple of minutes. To reinforce the glue, Calder nailed on the back through the foam into the wood. He put one on each corner, 2 on the long sides, and 1 on the short sides.
To attach the hanging mechanism, I used one of the ones I had left from the sunburst mirror project, and we nailed straight through the insulation into the wood, making sure it was perfectly centered. Make sure your nails are long enough to reach the wood.
All that’s left to do is hang it up! (it is surprisingly lightweight because of styrofoam being the main material!)
And add the pins! One color for my destinations, one for Calder’s and one for the places we visit together!
Did anyone else do any fun weekend projects??
ALSO! My sunburst mirror post is being featured over on my friend Courtney’s blog, Little Moments, today! Go take a look and check out her fun blog while you’re at it!


Look’s great! 🙂
good job mrs sagen! looks great!
Jenna,
I love your blog and the things you post! The map turned out great and your apt. looks awesome!
🙂
Wow! So creative! Another very nice project!
Featured you!
Stop by and see!
Stacey of Embracing Change
Pingback: Hookin Up with HoH #108
this looks great!! i also like your gray tv “stand”. where did you get it?
THank you! the stand is from IKEA!
I saw this just in time!!! I have been combing HD’s sheet goods, looking for the perfect backing for a 73″X49″ map I ordered for the kids playroom. I just finished painting and am ready to install the map this weekend. Brilliant idea to use foam!!! MDF was going to be difficult, not to mention, heavy to hang.
Thank you SO much!
~via HoH
Glad you found it in time! It really does make it super light to hang! I just checked out your blog..looks like you are in colorado too 🙂 I agree land and home prices are crazy expensive..at least in Denver where we are! Coming from KS it amazes us how much less we can get for our money..but my hubby always says we are paying for the mountains haha. I look forward to seeing how your map turns out!
Pingback: Estes Park! | The Happenings of the Sagens
Pingback: Finished Brick! | The Happenings of the Sagens